Intro
In the previous part, Automate your network labs with Ansible and GNS3: Part 1, we saw how to use the Ansible GNS3 collections module to automate a network lab setup.
On this part we will be focusing on a more complete network lab automation setup, going one step further by setting up boilerplate or initial configuration on our network devices and end hosts. This way we don't have to manually configure management interfaces, hostnames or basic SSH settings.
We will also use more advanced Ansible features to make our playbooks more robust and flexible.
To accomplish this we are going to focus on:
- Lab creation based on an Ansible inventory.
- Dynamic collection of device console information.
- Creation/Deployment of boilerplate or initial configuration based on the network device OS.
- Automatic lab creation/stop and destruction using roles.
This workspace can be found here if you want to follow along.
Scenario
The virtual devices to setup and configure are:
- Cisco IOSvL2
- Cisco IOSvL3
- Arista vEOS
- Alpine docker host
- NAT cloud

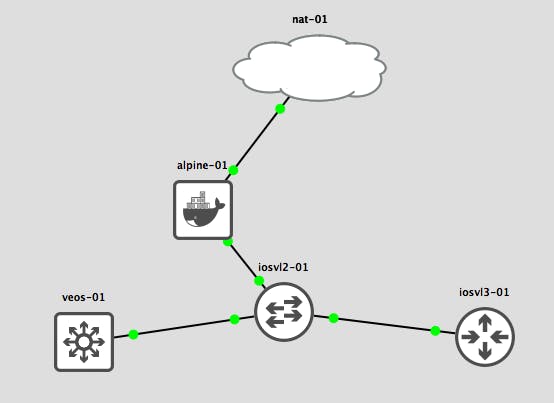
The connection design is to have iosvl3-01 and veos-01 “management interfaces” go through iosvl2-01 switch, which in turn is connected to the alpine-01 host.
The management network they share is 10.0.0.0/24, and their configuration is set to use that range and setup some basic SSH connections.
Also the alpine host will have another network interface connected to the NAT cloud for internet connectivity.
Requirements
In Automate your network labs with Ansible and GNS3: Part 1 you will find the requirements needed and provides a little bit more explanation on the installation of the different pieces of software. But to sum up you will need the following:
- Python with ansible installed in your environment.
netaddrpython package. It can be installed with pip ->pip install netaddr- gns3fy · PyPI installed in the same python environment.
- ansible-collections-gns3 installed.
- GNS3 server version >= 2.2.0.
- Network devices installed on the GNS3 server. In this case IOSv, vEOS and alpine docker.
New requirement
- Pexpect installed in the same python environment. This will be used to push short and simple network device configuration over the GNS3 server telnet/console port to the device.
NOTE: If using ansible version 2.8 the collections module is installed with mazer as indicated on the previous post. Starting ansible 2.9 you can install it with ansible-galaxy:
ansible-galaxy collection install davidban77.gns3
$ pip freeze | grep -E "gns3fy|ansible|netaddr|pexpect"
ansible==2.9.0
gns3fy==0.6.0
netaddr==0.7.19
pexpect==4.7.0

$ mazer list | grep "davidban77.gns3"
davidban77.gns3,1.5.0
Workspace setup
We will work on a standard Ansible Playbook directory layout. It will look something like this:
$ tree
.
├── README.md
├── ansible.cfg
├── inventory
│   ├── gns3_vars.yml
│   ├── host_vars
│   │   └── alpine-01.yml
│   └── hosts
├── lab.yml
├── lab_setup.yml
├── lab_teardown.yml
├── library
│   └── gns3_telnet_console.py
└── templates
    ├── alpine.j2
    ├── eos.j2
    └── ios.j2
You can find the repository here (demo-ansible-gns3/part2 at master · davidban77/demo-ansible-gns3 · GitHub)
The breakout explained:
inventory/hosts: Has all the devices that will be configured on our simulation. It will also hold the management variables information. More on this later.inventory/gns3_vars.yml: Holds the variables needed to create the GNS3 topology.library/gns3_telnet_console.py: Custom python Ansible module which usespexpectto push network device configuration.templates/<ansible_net_os>.j2: Jinja2 templates that hold the boilerplate configuration to be generated/pushed.lab.yml, lab_setup.yml, lab_teardown.yml: Playbooks that hold the workflow of creating, generating and pushing configuration, as well as tearing down the lab.ansible.cfg: Some settings to specify ansible how to run these playbooks.
Inventory file
Here is a snippet of the information inside the inventory file:
[network]
iosvl2-01  mgmt_ip=10.0.0.11/24  mgmt_interface=Vlan1                ansible_net_os="ios"  image_style="iosv_l2"
iosvl3-01  mgmt_ip=10.0.0.12/24  mgmt_interface=GigabitEthernet0/0   ansible_net_os="ios" image_style="iosv_l3"
veos-01    mgmt_ip=10.0.0.13/24  mgmt_interface=Management1          ansible_net_os="eos" image_style="veos"
For complete information see here.
The takeaway is that each network virtual device has the following variables:
mgmt_ip and mgmt_interface: Settings used when rendering the boilerplate configuration of the management interfaces of the virtual devices.ansible_net_os: Should mimic the same variable used in ansible for network appliances and is needed to determine which template to use and for the settings when pushing configuration over the telnet console.image_style: Is a variable needed when pushing the configuration. Basically it specifies which setting to apply for a certain image.
GNS3 variables and settings
The inventory/gns3_vars.yml holds information needed to setup and destroy the lab in GNS3 server. I encourage you to read [[Automate your network labs with Ansible and GNS3: Part 1]] for a more detailed explanation on the settings.
The new part is the boilerplate settings:
### Boilerplate configuration settings
boilerplate:
    # `generate` or `deploy` the configuration
    config: “deploy”
    # Flag used when config is set to `deploy`. When `no` it will prompt the user for
    # confirmation, when set to `yes` it will wait the minutes set in `automated_push_delay`
    automated_push: “yes”
    automated_push_delay: 3
It specifies how you want to configure the virtual devices, either just generate the configurations and save it under a build/ directory, or as in this case to deploy the configuration in an automatic manner.
For these settings it will try to push the configuration after 3 minutes of creating and turning the virtual devices up.
Templates
Depending on the device operating system, ansible_net_os, it will generate the respective boilerplate configuration so you can connect using SSH.
The templates are written on Jinja2, so they are used with the normal ansible modules and this is particularly useful when configuring the alpine docker host, but more on that later.
demo-ansible-gns3/part2/templates at master · davidban77/demo-ansible-gns3 · GitHub
Custom ansible module
This library/gns3_telnet_console.py module is where the configuration push, device reload and special settings are applied on the virtual images with the help of:
gns3_nodes_inventory: Module that collects the console of the virtual devices so can later telnet to them.pexpectpython package: Which uses the console information collected to perform the initialisation commands and runs the overall process to configure the devices with the boilerplate configuration.
The walkthrough on this module is outside of scope, but feel free to go through the code and reach out if you have questions.
NOTE: One thing to note here, I have not set this module as part of the Ansible GNS3 collections because of the ever changing nature of network devices boot and setup of their virtual images, is hard work to keep up… So I share this in the repository if somebody wants some reference to use it on their own virtual devices.
demo-ansible-gns3/gns3_telnet_console.py at master · davidban77/demo-ansible-gns3 · GitHub
Playbooks
The playbooks are configured in a way that you should only use the lab.yml to setup or destroy the lab based on playbook imports.
lab_setup.yml: Is in charge of setting up the GNS3 topology, turning up the devices, collect the nodes console information and generate/push the boilerplate configuration.
You can see that it is based on 2 playbooks, one for setting up the topology and collecting the console information of the nodes and the other to create and/or apply the configuration using gns3_telnet_console module.
This is a snippet of using the module to push parameters to the iosv2-01 switch in the topology:
- name: “Push config”
  when: ansible_net_os == “ios” and image_style == “iosv_l2”
  gns3_telnet_console:
    remote_addr: “{{ nodes_inventory[inventory_hostname][‘server’] }}”
    port: “{{ nodes_inventory[inventory_hostname][‘console_port’] }}”
    send_newline: yes
    login_prompt:
      - “>”
    user: “”
    password: “”
    prompts:
      - “[#]”
    command: “{{ boilerplate_config.splitlines() }}”
    pause: 1
    timeout:
      general: 180
      pre_login: 60
      post_login: 60
      login_prompt: 30
      config_dialog: 30
ansible_net_os and image_style are used to indicate which parameters to use with running the pexpect based module.
The nodes_inventory variable collected from the previous play is used here to indicate which port and remote_addr to use when connecting with the device, which in this case would be the console information for iosvl2-01 switch.
lab_teardown: Is in charge on stopping and deleting the GNS3 topology. Nothing much in this playbook.
More features can be added to the playbooks, like instead of detroying the lab it could create a backup and stop the nodes, contact a DB to specify timestamps when lab was running, etc… The exciting part is the number of possibilities for automated tasks that can be developed and used using this Ansible Playbook approach.
Lab setup
Ok! so let’s begin. To setup the lab you can just run the following command:
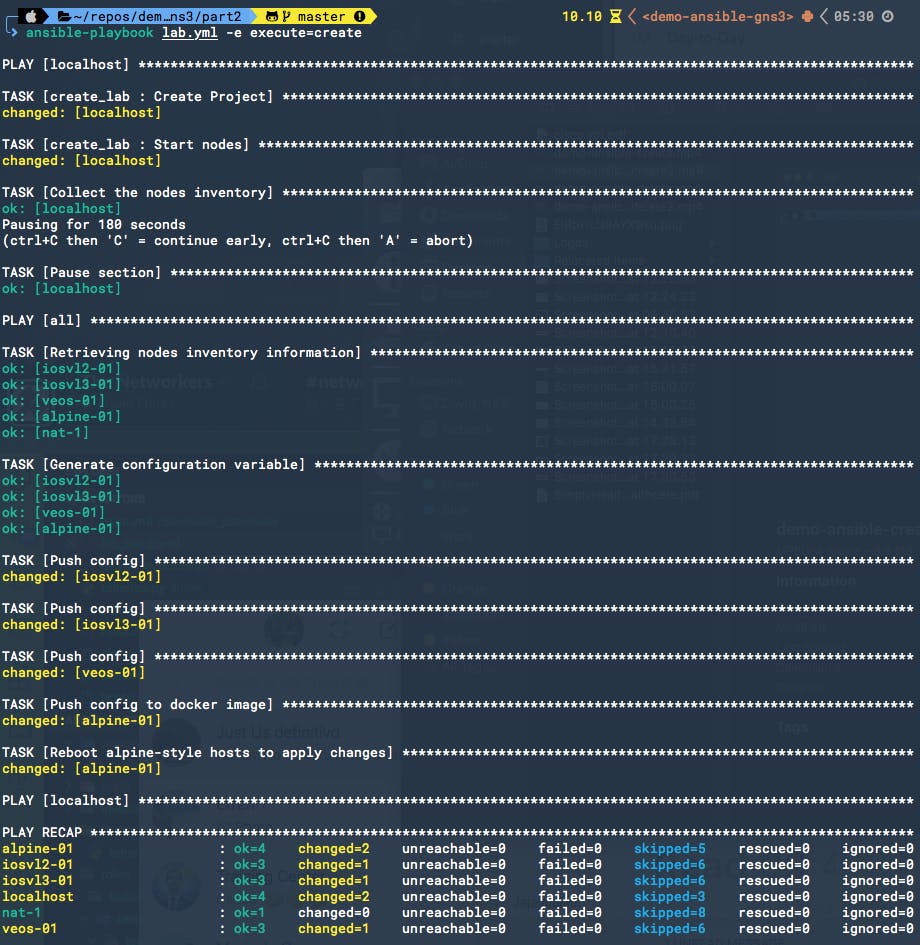
$ ansible-playbook lab.yml -e execute=create
Here is an example of the execution:

It actually takes around 10 minutes on my current setup :). This is mainly because the Arista device needs to disable Zero Touch Provisioning which causes a reboot on the node.
Special host configuration - alpine docker
For most of the virtual devices, except the GNS3 builtin ones like the NAT cloud, the configuration is generated and pushed through telnet/console.
But this does not apply for the docker images like alpine. It still uses the Jinja2 template to generate the standard alpine network interfaces configuration file but instead of applying it through telnet, it will load the configuration file to the alpine node directory inside the GNS3 server, and then it will reload it to apply the changes.
demo-ansible-gns3/lab_setup.yml at master · davidban77/demo-ansible-gns3 · GitHub
Verify lab and connectivity
Now the devices are up and boilerplate configuration pushed, we can test connectivity from alpine-01 to the network devices and also to the internet.
Perform ping from iosvl3-01 to the other devices management interfaces:
iosvl3-01
iosvl3-01#sh ip int br
Interface                  IP-Address      OK? Method Status                Protocol
GigabitEthernet0/0         10.0.0.12       YES manual up                    up
GigabitEthernet0/1         unassigned      YES unset  administratively down down
GigabitEthernet0/2         unassigned      YES unset  administratively down down
GigabitEthernet0/3         unassigned      YES unset  administratively down down
iosvl3-01#
iosvl3-01#ping 10.0.0.14
Type escape sequence to abort.
Sending 5, 100-byte ICMP Echos to 10.0.0.14, timeout is 2 seconds:
.!!!!
Success rate is 80 percent (4/5), round-trip min/avg/max = 4/6/10 ms
iosvl3-01#ping 10.0.0.11
Type escape sequence to abort.
Sending 5, 100-byte ICMP Echos to 10.0.0.11, timeout is 2 seconds:
.!!!!
Success rate is 80 percent (4/5), round-trip min/avg/max = 2/3/8 ms
iosvl3-01#
On alpine-01 we can download openssh and perform an SSH connection against iosvl2-01 with our hardcoded credentials of netops:
alpine-01
/ #
/ # ssh netops@10.0.0.11
/bin/ash: ssh: not found
/ # apk add openssh
(1/7) Installing openssh-keygen (8.1_p1-r0)
(2/7) Installing libedit (20190324.3.1-r0)
(3/7) Installing openssh-client (8.1_p1-r0)
(4/7) Installing openssh-sftp-server (8.1_p1-r0)
(5/7) Installing openssh-server-common (8.1_p1-r0)
(6/7) Installing openssh-server (8.1_p1-r0)
(7/7) Installing openssh (8.1_p1-r0)
Executing busybox-1.30.1-r2.trigger
OK: 45 MiB in 26 packages
/ # ssh netops@10.0.0.11
The authenticity of host '10.0.0.11 (10.0.0.11)' can't be established.
RSA key fingerprint is SHA256:xxx23234hjsidfrjn2343434mkkKXNJ0Pl4xxnP+ez4z0.
Are you sure you want to continue connecting (yes/no/[fingerprint])? yes
Warning: Permanently added '10.0.0.11' (RSA) to the list of known hosts.
Password:
iosvl2-01#
iosvl2-01#
Lab destruction
Its as easy as running:
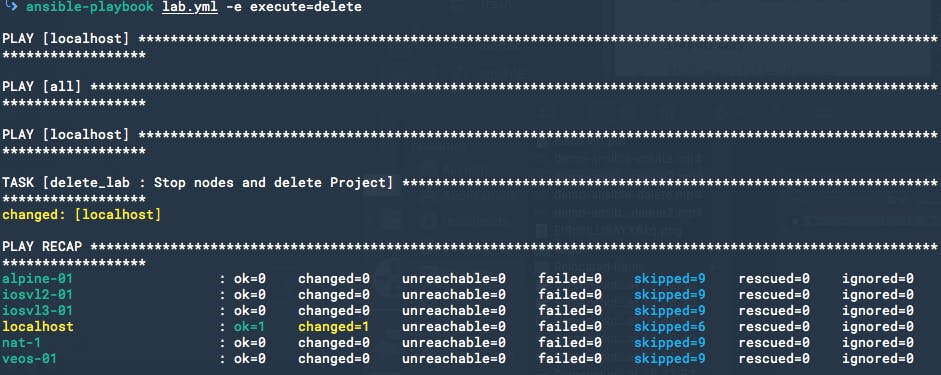
$ ansible-playbook lab.yml -e execute=delete
Example of execution:

Final thoughts
At the end of the day this serves as a blueprint for your network lab needs. The repository can be forked and modified to your lab needs and you can even customize with your own workflows. As I stated before an example of a workflow could be to stop and backup the nodes instead of just destroying the lab, or connecting it with Slack to notify on a channel that a lab is coming up, or use it as part of a CI/CD deployment!
Let me know your thoughts!
