


Intro
In Manage your GNS3 network labs programmatically with gns3fy I talked about the use of gns3fy python library to interact with GNS3 server REST API. On this blog post I will go one step further, using an ansible collections module to manipulate your GNS3 network topologies 😃!.
Scenario
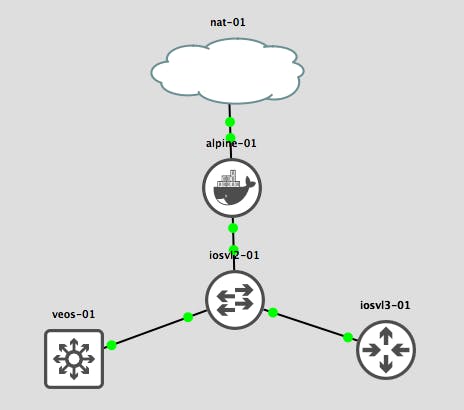
We will create the following topology on the GNS3 server using ansible.

Requirements
Some preparation needs to happen on the hosts where ansible will be executed and the GNS3 server.
Ansible host
You will need the following:
- Python with ansible installed in your environment.
- gns3fy · PyPI installed in the same python environment.
- ansible-collections-gns3 installed. More on this further below.
- GNS3 server version >= 2.2.0. Although it might work for versions of 2.1, I suggest to upgrade with 2.2.0 or upwards since modules were developed using the REST API of this version.
At the time of this writing the ansible version is 2.8, meaning that collections are handled by an application named mazer. More information is provided on the links above and instructions on how to install them, but to follow with this example this is basically what needs to be done:
On your python virtual environment:
pip install gns3fy mazer
Then run mazer to install the ansible collection.
mazer install davidban77.gns3
This will install the module and roles to interact with GNS3
GNS3 server
Besides the requirements on the software side, you also need to verify that the server is reachable on te REST API port, by default is 3080.
For this example I have configured the following templates:
- IOSv-L2
- IOSv-L3
- vEOS
- Alpine - Docker
- NAT - cloud object to connect to internet
Now, lets get to business…
Ansible connection to GNS3
To start we can verify with ansible the current version of the GNS3 server. This will validate that dependencies are correctly installed and a connection to the REST API is possible:
lab_setup.yml
- hosts: localhost
  gather_facts: no
  vars:
    gns3_url: "http://dev_gns3server"
  collections:
    - davidban77.gns3
  tasks:
    - name: "Verify version of GNS3 server"
      gns3_version:
        url: "{{ gns3_url }}"
      register: version
    - debug: var=version
In ansible 2.8 you can import the modules installed with the collections keyword, and specify a list of the collections you wish to import. Here we are just going to use 2 modules: gns3_version and gns3_project.
We pass the gns3_url variable to the gns3_version module (by default the port used to establish a connection with the REST API is 3080).
When running the playbook, you should something like this:
$ ansible-playbook lab_setup.yml

PLAY [localhost] **************************************************************************

TASK [Verify version of GNS3 server] ******************************************************
ok: [localhost]

TASK [debug] ******************************************************************************
ok: [localhost] => {
    "version": {
        "changed": false,
        "failed": false,
        "local_compute": false,
        "version": "2.2.0b4"
    }
}

PLAY RECAP ********************************************************************************
localhost                  : ok=2    changed=0    unreachable=0    failed=0    skipped=0    rescued=0    ignored=0
You can see from the output of the version variable that this server is version 2.2.0b4.
Building the topology
Great, we have a good connection and we checked that we can call the ansible modules without problems. Now let’s build the topology.
We need to specify the nodes and links of the topology. For the nodes we can define a variable called gns3_nodes_spec:
gns3_nodes_spec:
      - name: "iosvl2-01"
        template: "Cisco IOSvL2 15.2.1"
      - name: "iosvl3-01"
        template: "Cisco IOSv 15.7(3)M3"
      - name: "veos-01"
        template: "vEOS-4.21.5F"
      - name: "alpine-01"
        template: "alpine"
      - name: "nat-01"
        template: "NAT"
Is a list of dictionaries where you specify the name of the node and the template from where the specification will be derived from. The template name must match with the one specified on the server.
For the links we can define a variable called gns3_links_spec:
gns3_links_spec:
      - ["alpine-01", "eth0", "iosvl2-01", "Gi0/0"]
      - ["iosvl3-01", "eth0", "iosvl2-01", "Gi0/1"]
      - ["veos-01", "Management1", "iosvl2-01", "Gi0/2"]
Is a list of lists, where each element of the main list is a link specification. The format goes like this: node_a, port_a, node_b, port_b.
Now we can add these variables to the playbook, along with project_name and nodes_strategy, which basically tells which method to use when starting up the nodes.
Coming all together:
- hosts: localhost
  gather_facts: no
  vars:
    gns3_url: "http://dev_gns3server"
    gns3_nodes_spec:
      - name: "iosvl2-01"
        template: "Cisco IOSvL2 15.2.1"
      - name: "iosvl3-01"
        template: "Cisco IOSv 15.7(3)M3"
      - name: "veos-01"
        template: "vEOS-4.21.5F"
      - name: "alpine-01"
        template: "alpine"
      - name: "nat-01"
        template: "NAT"
    gns3_links_spec:
      - ["alpine-01", "eth0", "iosvl2-01", "Gi0/0"]
      - ["iosvl3-01", "Gi0/1", "iosvl2-01", "Gi0/1"]
      - ["veos-01", "Management1", "iosvl2-01", "Gi0/2"]
  collections:
    - davidban77.gns3
  tasks:
    - name: "Create network topology"
      gns3_project:
        url: "{{ gns3_url }}"
        project_name: "demo_lab"
        state: present
        nodes_spec: "{{ gns3_nodes_spec }}"
        links_spec: "{{ gns3_links_spec }}"

    - name: "Start nodes"
      gns3_project:
        url: "{{ gns3_url }}"
        project_name: "demo_lab"
        state: opened
        nodes_state: started
        nodes_strategy: one_by_one
The gns3_version is deleted since is no longer needed, and added 2 mores tasks: Create network topology and Start nodes.
The creation of the network topology needs state: present and the nodes_spec and links_spec. While the startup of the nodes task just needs to verify that the project is opened and the state expected of the nodes is started.
The state is key regarding the action you want to perform, after all you can create/delete or open/close projects, as well as manipulate states on the nodes. If you want to read more into the available modes take a look at the module documentation.
Let’s run it:
$ ansible-playbook lab_setup.yml

PLAY [localhost] **************************************************************************

TASK [Create network topology] ************************************************************
changed: [localhost]

TASK [Start nodes] ************************************************************************
changed: [localhost]

PLAY RECAP ********************************************************************************
localhost                  : ok=2    changed=2    unreachable=0    failed=0    skipped=0    rescued=0    ignored=0
Missing link! - let’s test idempotency
So far good, the topology is created and nodes started but if you open the topology, for example with the GNS3 GUI application, there is a missing link between the NAT cloud and the alpine docker host. Let’s fix that.
gns3_links_spec:
      - ["alpine-01", "eth0", "iosvl2-01", "Gi0/0"]
      - ["alpine-01", "eth1", "nat-01", "nat0"]  # Added here
      - ["iosvl3-01", "Gi0/1", "iosvl2-01", "Gi0/1"]
      - ["veos-01", "Management1", "iosvl2-01", "Gi0/2"]
Let’s run again the playbook.
$ ansible-playbook lab_setup.yml

PLAY [localhost] **************************************************************************

TASK [Create network topology] ************************************************************
changed: [localhost]

TASK [Start nodes] ************************************************************************
ok: [localhost]

PLAY RECAP ********************************************************************************
localhost                  : ok=2    changed=1    unreachable=0    failed=0    skipped=0    rescued=0    ignored=0
The only change reflected is the new link added, there were no tasks executed on the nodes because the module checked their status and it they were already set as started.
If you want to run it again it is safe to do so, nothing will change on the topology.
Using the GNS3 GUI client or the web UI on the server you can open the topology. All the devices are positioned on coordinates x=0, y=0, so you need drag them to the positions you want. For example:
At this stage you should be able to log into the devices of the lab, and perform configuration tasks to test the topology.
Let’s destroy the lab
Verifying that the lab setup works, we can delete the topology.
There is a separate playbook that stops the nodes and deletes the topology.
lab_destroy.yml
- hosts: localhost
  gather_facts: no
  vars:
    gns3_url: "http://dev_gns3server"
  collections:
    - davidban77.gns3
  tasks:
    - name: "Stop nodes and delete project"
      gns3_project:
        url: "{{ gns3_url }}"
        project_name: "demo_lab"
        state: absent
The ansible modules makes your GNS3 projects far more portable. Because now with only changing variables like project_name, nodes_spec and links_spec, you can easily create and destroy GNS3 projects.
Multiple network scenarios can be stored in a version controlled system like Github, and use the same playbook style to set the GNS3 projects.
What’s next?
So far we have covered a creation/destruction of a network topology lab using ansible modules. There are roles inside the same collection that perform these tasks, we just did it step by step to show you the variables used and how to setup your lab on a per-task basis.
On the next part I will show you how to setup a boiler plate configuration for your lab, and how a custom ansible module can help you push this boiler plate configuration even if the nodes need to restart. So stay tuned 😃!
#bethepacket